{Wine Wednesday} Wine barrel cocktail table

After we did our big remodel last summer we moved our table from the deck to the lower patio. In doing that, I noticed a lack of horizontal surfaces on the deck. I’ve been thinking long and hard about different options and settled on a wine barrel cocktail table.

Finding the barrel was the hard part. We go to Woodinville a lot, and I’ve had my feelers out for awhile. Finally we found one! Efeste had a barrel available for purchase. We bought our other barrels at Efeste too and their price has gone up. This barrel cost $65.

Our wine barrel table -- the "before" photo

Our wine barrel table — the “before” photo

Barrels are heavy. We hauled the barrel up the back stairs and that was enough. Not only was it going to be a pain to move around, it also dented the decking a bit. I had envisioned adding wheels on the bottom for convenience, but quickly realized it was a necessity to preserve the deck.

We used three 2″ rotating wheels (without brakes) from Lowe’s. They fit snugly in the rim of the barrel and provide about 1″ of clearance. It looks like the barrel is floating over the deck.

Three 2" wheels, screwed directly into the barrel

Three 2″ wheels, screwed directly into the barrel

The underside of the barrel -- evenly spaced wheels

The underside of the barrel — evenly spaced wheels

The barrel had some gross black spots on it (which were more of a stain and less of a black mold), so I knew I needed to clean it up. I started with a good soapy-water scrub. From there, I used a sanding block to continue scrubbing. It got a lot of the black out.

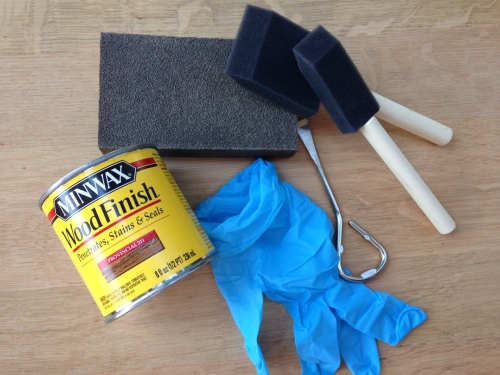
I’m pretty experienced in staining and had all of the necessary tools on-hand: a latex glove, sponge brush (I only ended up using one 1″ brush), paint can opener, and plastic drop cloth. Not pictured and totally necessary: a stain-removing cloth. We use Brandon’s old undershirts for this purpose.

Barrel staining necessities

Barrel staining necessities

Once the barrel was clean, I used the “Provincial (211)” 8 oz Minwax Wood Finish stain and stained, stained, stained.

No stain, no gain!

No stain, no gain!

What a difference!

What a difference!

You can still see some of the black underneath the stain, but all in all, I love the way it turned out.

Final product!

Final product!

Look at that grain! Ooooh! Awww!

LOVE this new cocktail table!

LOVE this new cocktail table!

Have a great Wine Wednesday! Enjoy the last few days of Washington Wine Month!


Bybee Farm blueberries

Nearly 9 lbs of delicious

Nearly 9 lbs of delicious

Every August Brandon and I make the trek to North Bend to pick blueberries at Bybee-Nims Farm. It’s one of my favorite (and most delicious) traditions of ours. We also try to pick raspberries at Harvold Farms in Carnation, but missed it with Brandon’s big test and my busy work schedule this year.

Bybee Farms: the best blueberry picking in town

Bybee Farms: the best blueberry picking in town

Blueberries cost $1.95/lb and the smallest bucket they offer fills up around 5 lbs. Brandon and I picked for an hour and a half and ended up with almost 9 lbs. We’ve given some out to our neighbors and friends. If you want to visit Bybee, make sure you check their website to make sure they’re open before you head out. We learned that one the hard way one year…

Blueberries, blueberries, everywhere!

Blueberries, blueberries, everywhere!

Blueberry picking

Blueberry picking

Visiting Bybee Farm is a two-part tradition. The other part is a visit to Scott’s Dairy Freeze. The SDF is stuck in time. It’s like Dick’s, but better. We always get burgers, shakes, and fried foods (fries or onion rings). SDF also has excellent chocolate-vanilla swirled soft serve ice cream.

Scott's Dairy Freeze: YUM!

Scott’s Dairy Freeze: YUM!

Speaking of ice cream, here is the pie Brandon made with our blueberries.

Yummmm.... Pie....

Yummmm…. Pie….

In case you were wondering, here is the filling recipe we used this time, derived from Food & Wine’s 2008 Annual Cookbook:

  • 2.5 lbs of blueberries
  • 3/4 c granulated sugar
  • 1/3 c + 1 T cornstarch (We used tapioca instead…)
  • 2 T lemon juice
  • 1/2 t lemon zest
  • Pinch of salt

I love blueberry season! Have a great rest of the week and happy Wine Wednesday!


My Q13 debut with tailgating treats and crafts!

I woke up early on Friday and made my way to the Q13 studio for my debut. It went really well and hopefully I’ll be back for future segments!

In case you missed it Friday morning, here is the segment:

Q13 tailgating segment

Find more information, including recipes, templates, and step-by-step instructions on the blog!

Here are some photos from my big morning. A very special thank you to my friend, and regular blog reader, Megan, for her help with the prep and execution of the segment. I couldn’t have done it without you!!

All set up on the weather deck

All set up on the weather deck

Watch out! Live microphone! Thanks, Walker.

Watch out! Live microphone! Thanks, Walker.

Cracking up Kaci -- maybe we were talking about frosting laces?

Cracking up Kaci — maybe we were talking about frosting laces?

Photo of the spread by Travis

Photo of the spread by Travis

My first "tease"

My first “tease”

Looked good on TV!

Looked good on TV!

And we're live in 3...2...1!

And we’re live in 3…2…1!

Thank you for reading! Have a wonderful week!!


Tailgating crafts: Fun with AstroTurf

The craft portion of the spread

The craft portion of the spread

Are you a new visitor from Q13? Welcome! Please, look around and stay awhile! Enjoy!

I was honored to share my tailgating crafts this morning on our local morning show on Q13, along with some delicious desserts:

Today is the Seahawks pre-season home opener against the San Diego Chargers. In anticipation of this game and the so-close-we-can-taste-it football season, I’m here to offer some great ideas, courtesy of Pinterest and my imagination.

I started off by picking up a 6′ x 8′ roll of AstroTurf from Home Depot. (Yes, 48 SF of bright green plastic rug!) When you’re picking up your AstroTurf, make sure that it’s backed in rubber, not the one that’s in a huge roll in the carpet section that needs to be applied with glue. The rubber-backed version has a black backing and is a lot more flexible. The whole roll was on sale and cost ~ $18.00.

It’s best to do all of these projects outside or in a space that’s easily cleaned, as cutting AstroTurf is messy business.

Now, time for some crafts:

AstroTurf Platter

  • 12″ x 12″ tile from Home Depot ($0.68) — or whatever size tile you want!
  • Hot glue gun + extra glue sticks
  • Scissors
  • Exacto knife (optional)
AstroTurf platters: works with any size tile!

AstroTurf platters: works with any size tile!

Place the tile on an upside-down piece of turf. Cut around the tile, about 1/2″ from the border of the tile. When you’re cutting, be sure to cut along the lines (less messy this way). It’s not the end of the world if you cut outside of the lines.

Take the cutout piece and liberally glue the top of the tile to the bottom-side of the AstroTurf. Press it flat. Glue along the tile edge and fold the AstroTurf overhang along the tile edge, similar to wrapping a present. Cut off any extra with an Exacto knife. Flip over your tile platter and VOILA! AstroTurf magic. This platter would be perfect for a football tailgate or viewing party, and would also work for a golfing-themed party.

This simple design is really versatile and works for any size of tile. I also used a 5″ x 5″ tile, in which I flipped the tile and glued the AstroTurf to the backside of the tile. You’ll see here that I stacked my two platters on top of one another with wine corks.

What’s that on top of the platters? Skittles vodka!
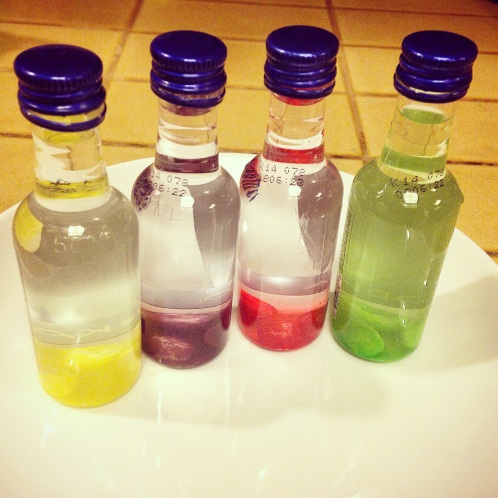
Skittles vodka! Given some time, these will be vibrant

Skittles vodka! Given some time, these will be vibrant

Skittles are the (un)official candy of the Seahawks and appeared throughout my tailgating table this morning. Making Skittles vodka is super easy. I took the single ounce bottles of vodka and popped three of the matching color of Skittles into each of them. After three or so hours, a bright color will take over the bottle. There will be some sugar residue, so you can strain it off, or just drink it.

AstroTurf Coasters

  • 4″ x 4″ tile from Home Depot ($0.13 each) — or whatever size tile you want!
  • Sheets of felt ($0.33 each from Michael’s — they come in a variety of colors)
  • Hot glue gun + extra glue sticks
  • Scissors

Same idea as the platters above, with an extra step.

Measure and cut all of your pieces. Your felt should measure about 1/2″ beyond the tile in all directions. Cut your square of AstroTurf the same width as your tile.

Glue the tile liberally and place it in the middle of the felt. You can either glue the finished or unfinished side of the tile. Both will get covered up, so it doesn’t matter. Glue along the tile edge and fold the felt overhang along the tile edge, similar to wrapping a present. Once the glue has dried (less than a minute), add more glue to the top and press down your AstroTurf square.

My AstroTurf coasters: Customize your felt to match your team colors

My AstroTurf coasters: Customize your felt to match your team colors

Beer koozies

I have two koozie designs. Both are easy to make and both templates can be found on this PDF. (Astroturf templates)

Beer koozies

Beer koozies

Design A (without laces):

  • Cold, full can of beer (or soda)
  • AstroTurf cut to the specifications of Design A on this AstroTurf template
  • Hot glue gun, glue sticks

Roll the AstroTurf around the can. Glue a line along the XXX-marked edge of the grass-side of the AstroTurf. Overlap the excess and carefully press the sides together. The full cold can will work to your advantage here, as it won’t allow the hot glue to stick to it. Once the glue is cool to the touch, slide the koozie off of the can. It should fit snugly, but still be able to slide off.

Design B (with laces):

  • Can or bottle of beer (doesn’t need to be cold!)
  • AstroTurf cut to the specifications of Design B on this AstroTurf template
  • Hot glue gun, glue sticks
  • Small hole punch
  • White suede laces or white shoe laces (I bought 8 yards of suede laces for ~$6 at Michael’s)

Punch holes in the AstroTurf per the specifications on the template (Design B). Wrap your AstroTurf around the can or bottle to see how much room you need to leave. Cut a long enough (about 4 times the height of your can) strand of laces and thread it through the bottom punches. Pretend it’s a pair of shoes and lace it right up. Finish it on the top with a knot or bow.

Fancy!

Fancy!

Wine tags

But wait! There’s more! I made two variations on the wine tag as well.

You’ll need the following:

  • AstroTurf (cut as described below)
  • Small hole punch
  • White suede laces or white shoe laces (I bought 8 yards of suede laces for ~$6 at Michael’s)

The first comes without a template. Simply cut a shape out of your AstroTurf, punch a hole in it and thread some lace through it. Leave a long enough length that you can tie a bow around your glass. You can use a paint pen or stickers to put an identifier on the shape. I used a “K” for Kaci, the Q13 anchor I spoke to this morning.

AstroTurf wine tags

AstroTurf wine tags

The template for the second wine tag variation can be found on this AstroTurf template, with the koozie designs. Simply cut out the tag in the described shape. You can stop here, although I like punching holes on either side of the slit (and indicated on the template) and tying a white suede lace bow to keep the edges together.

And that’s it! Now, what else should I do with the 40 SF of AstroTurf that I have left?! This is my official warning to family and friends: you’re getting AstroTurf coasters and platters for Christmas!

I’ll leave you with my pretty finger, donned with a fancy SuperBowl ring and I’ll post the footage as soon as it’s online! Thanks again for stopping by!

Oh, hello, SuperBowl Ring!

Oh, hello, SuperBowl Ring!

Full disclosure: I rooted for the Broncos during the Superbowl. Brandon, my husband, was born in Denver and has been a Bronco fan his entire life. The Seahawks are a very close #2 for us and in any other circumstance, we would have rooted for them.

Pizza, Pizza: We made pizza!!

WE DID IT! We made pizza in our backyard wood-fired oven!

Up to temp!

Up to temp!

After weeks of curing the oven and focusing on things other than delicious, delicious pizza, Brandon’s brother, James, and sister-in-law-to-be, Jessica, joined us for our inaugural pizza cooking event last weekend. We got the oven up to temp, approximately 800 degrees, in about 45 minutes.

Feelin' hot-hot-hot!!

Feelin’ hot-hot-hot!!

A wonderful shot of the flames leaping toward the pizza

A wonderful shot of the flames leaping toward the pizza

James brought homemade dough up from his house that he made the night before; it was chewy and fluffy and turned out so well. I’ll share the recipe when he sends it up. Until then, this is our favorite dough recipe.

Our first wood-fired pizza!

Our first wood-fired pizza!

We made four pizzas total, topped with different combinations of tomato sauce, mozzarella, prosciutto, salami, minced garlic, onions, black olives and fresh herbs (basil, sage, and rosemary from the garden). We devoured them while pairing them with my favorite kale salad and a bottle of the 2011 La Previa from Robert Ramsay Cellars.

My favorite meal: Pizza and kale salad

My favorite meal: Pizza and kale salad

In addition to James’ pizza experience (he used to work at a pizzaria), we’ve been using “The Art of Wood Fired Cooking” to help us understand how the oven works and for some great recipes.

Robert Ramsay La Previa + Pizza oven!

Robert Ramsay La Previa + Pizza oven!

We let the fire die down to just the embers and popped in a sage focaccia (from the aforementioned book). We left the oven a little too hot, and it cooked in half the called-for duration, but it turned out great!

The proud chef with his focaccia (before...)

The proud chef with his focaccia (before…)

Focaccia: after

Focaccia: after

This is only the beginning. We need to order a few more tools (a smaller peel for tuning the pizzas, an ember bucket, a fire poker, etc.).   Our theme for dinners for the week is “wood-fired” and we have some great ideas pinned in my “Pizza! Pizza” board.

We (James) also learned the hard way that you shouldn’t stand too close to the fire. I’m sure his hair will grow back…

Crispy hair: Don't get too close to the oven!

Crispy hair: Don’t get too close to the oven!


{Wine Wednesday} Happy Washington Wine Month!

WineWednesday

WA Wine Month 2014August is Washington Wine Month and you know I’m going to celebrate!

We started off our Washington Wine Month with a bottle of the 2011 Sundance red blend from Soos Creek Wine Cellars (Columbia Valley). Here’s the blend: 38% Cabernet Sauvignon, 34% Merlot, 15% Syrah, and and 13% Cabernet Franc. Delicious. And only $20 per bottle.

To continue the celebrations, Brandon and I are headed to Woodinville to taste some fine Washington wines and this next weekend. (I love Woodinville! Read more here, here, here and more!)

Here are some of our favorite Woodinville wineries, in alphabetical order so no feelings get hurt. Maybe I’ll see you over in Woodinville this weekend?!

2014-8 Davenport

Davenport Cellars

We love all of their wines — both reds, whites and roses! Go! Taste! And tell Jeff & Sheila hello for us!

2014-8 Efeste

Efeste

Ditto with Davenport. Their wines are great and the tasting room is a work of art. Enjoy!

2014-8 Pomum

Pomum Cellars

These Spanish-style wines are spicy and wonderful. We like the Shya Red and the riesling.

Robert Ramsay

Robert Ramsay Cellars

We discovered this winery through a Living Social deal and we have gone back every time since! Their spicy Rhone-style wines are right up my alley and definitely don’t disappoint!

2014-8 Silver Lake

Silver Lake Winery

The Roza Red blend is one of my favorites! It’s only $12/bottle.

2014-8 Two Vintners

Two Vintners

The same wine makers as Covington Cellars, Two Vintners makes great wines, especially their Zin, my favorite!

Cheers to Washington wines! (Yes, that’s a working wood-fired oven in the background!!)

Robert Ramsay