
Celebrating the striking down of DOMA? Celebrating the first week of summer? Celebrating Wednesday? I found this gem on Pinterest to help you pick that perfect bottle of vino! Happy drinking… and cheers!

Celebrating the striking down of DOMA? Celebrating the first week of summer? Celebrating Wednesday? I found this gem on Pinterest to help you pick that perfect bottle of vino! Happy drinking… and cheers!
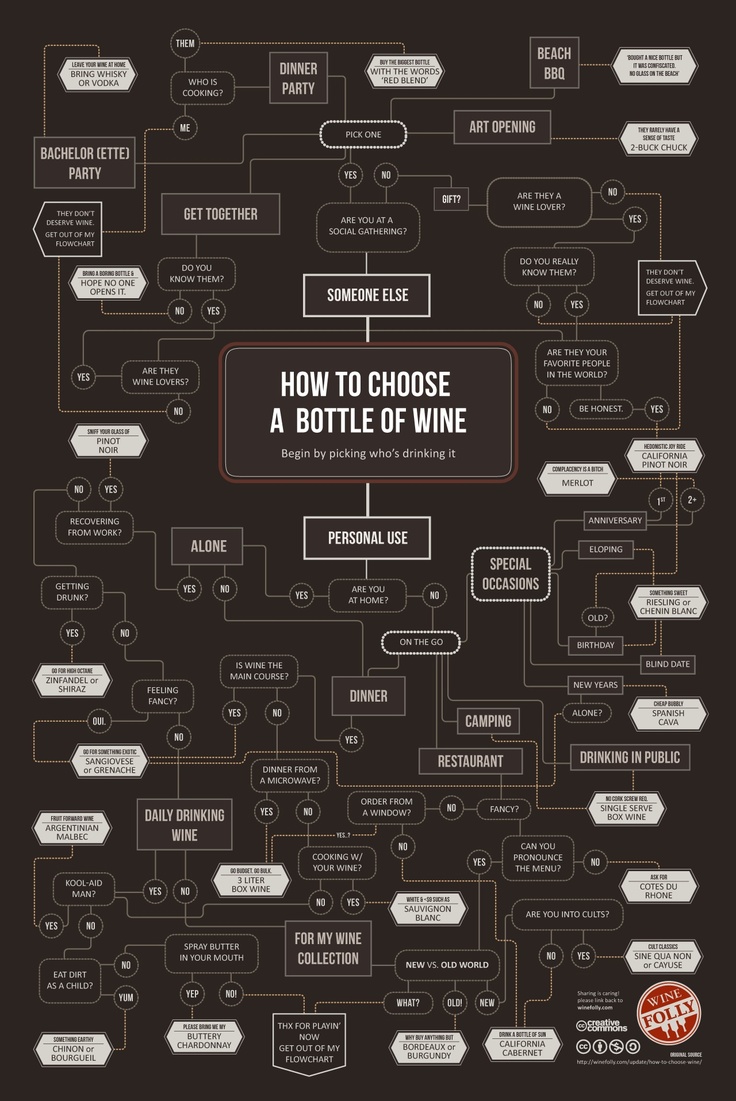
Cue the oooohs and aaahhs: It’s BISTRO LIGHT time!
My parents put up bistro lights over their patio a few years ago (for our rehearsal dinner in 2011) and ever since I’ve wanted them in our backyard. One of the main reasons we put in the patio was to put up bistro lights!

First draft of the layout
My Dad was essential for the design help. As with most projects, this one was a lot more work than I initially thought. (We’re facing something similar with the pizza oven right now…) It took me a bit to wrap my head around the guide/guy wire concept, but luckily my Dad had already been through the process once and was patient when explaining it (over and over again) to me. He even provided detailed drawings, like this one.
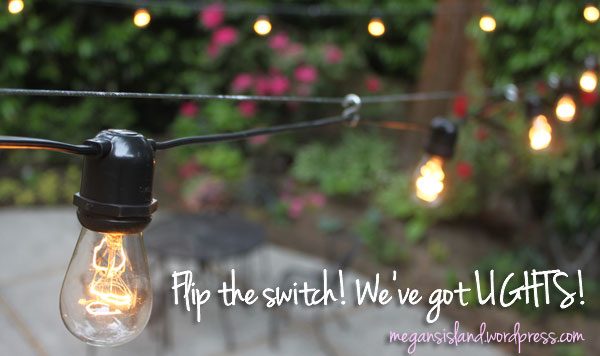
First things first, I had to buy the lights. I used the same company and products as my parents did: Budget Lighting.
This is what I ordered. The grand total ended up being $154.70 + shipping. BLI has a $25 minimum order, so I ordered double lightbulbs to replace them as they burn out, since ordering additional bulbs later wouldn’t meet the minimum order.
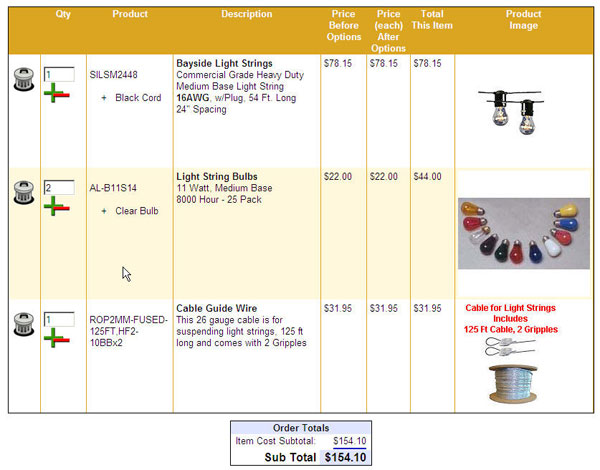
Here’s what all of the “ingredients” of this project looked like:
With the materials in hand, my Dad drew a more detailed sketch and we went to Lowe’s to pick up the remaining tools: “S” clips, tighteners, hooks for the deck and tree and an outdoor extension cord.
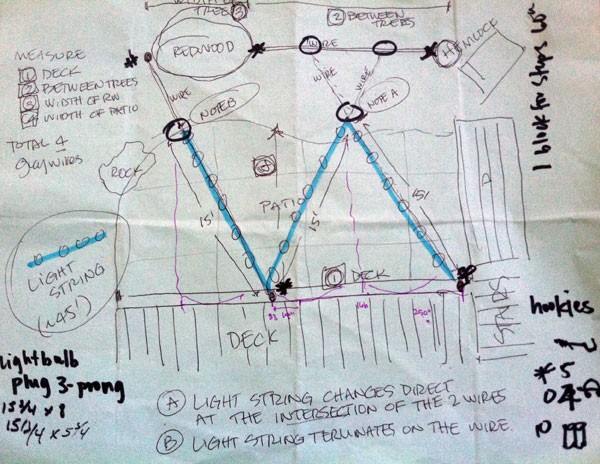
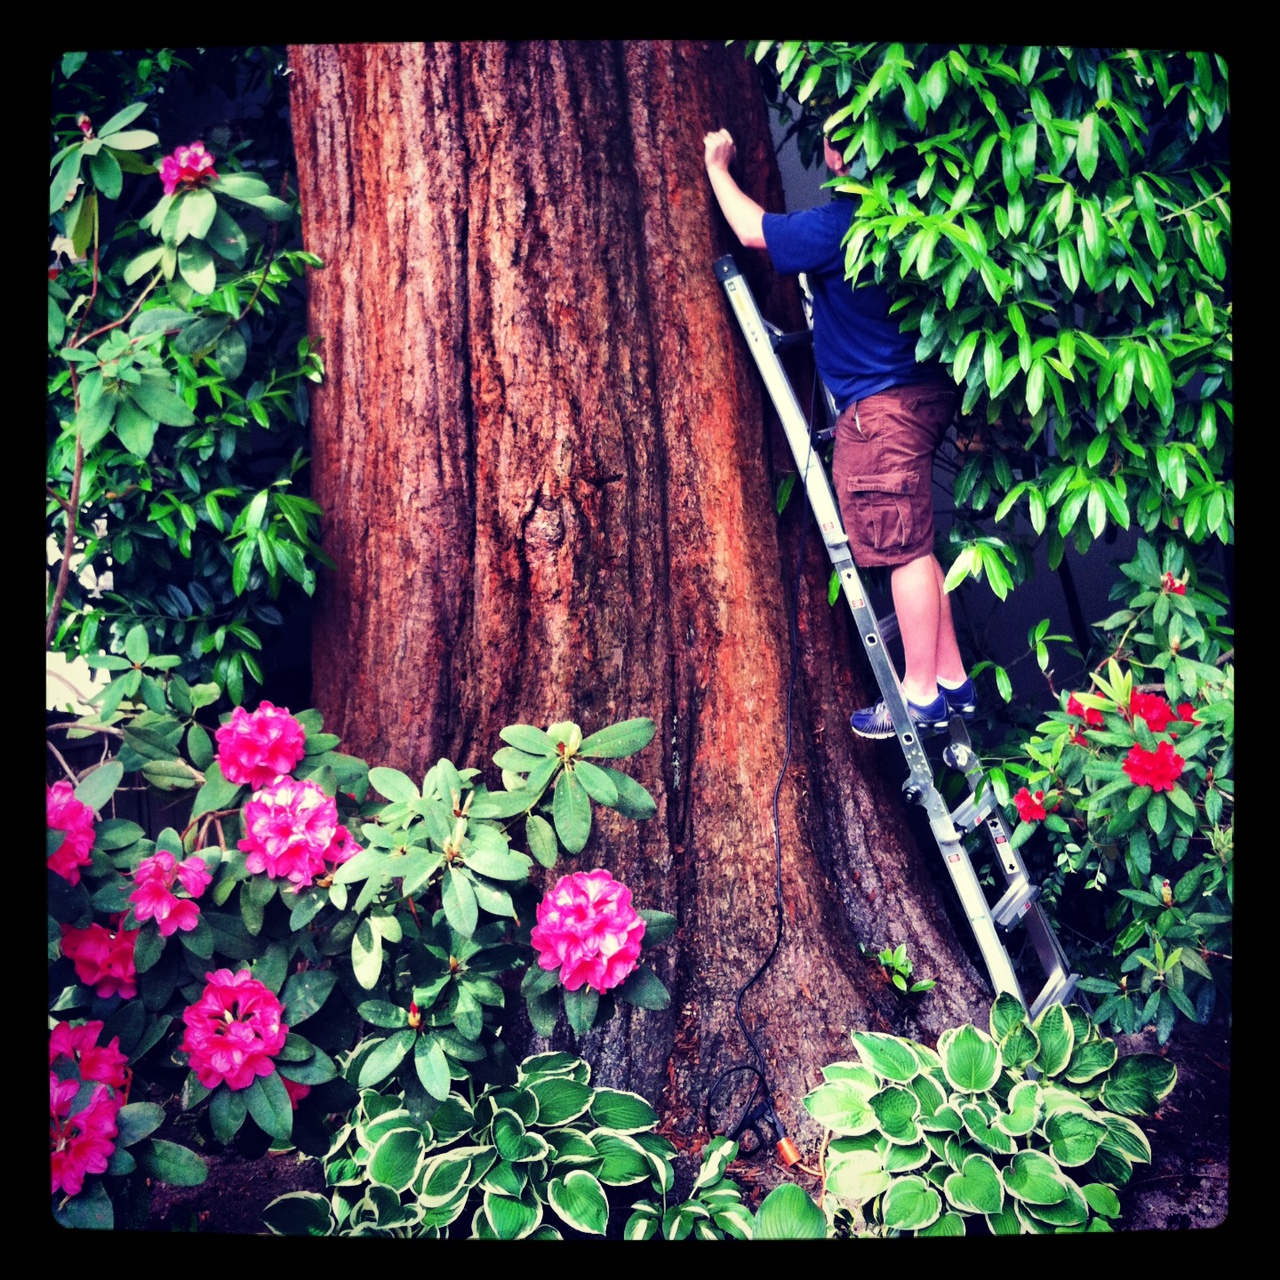
We measured and cut the wires to match the diagram. Then we drilled into the trees and connected the wires. Where’d Brandon go!?
From there, we hung the lights, flipped the switch and voila! What do you think? I almost want it to get darker earlier again. Almost.


Happy SUMMER! Wahoo! Today is the first official day of summer and this blogger couldn’t be happier! (Although the weather today is less than desirable. My favorite weatherman, Rich Marriott claims it’ll be in the upper 70’s over the weekend…)
To kick off our ‘Gone Pinning’ series, here are some of the things we’re most excited for this summer. Check out all of my favorites for the season on my Sunshine-y Days Pinterest Board.
First, summers aren’t complete without some delicious eats:

Oh yes, this would be delicious!

Peach caprese!?!?!

Fresh peaches + raspberries + sugar= AMAZING

I heart figs. I heart pizza. This would be amazing!
And something to drink with it…

Popsicles + champagne = GENIUS

Margarita? Yes, please.
I’ve always wanted to make this but don’t think we have the room, so you should make it instead!

Oh yeah! Wine on the rocks in a bench!
And this is a bit of a mantra of mine…

‘Tiz true.
HAPPY SUMMER! How are you planning on celebrating the change in seasons?
Today I’m celebrating my little sister Molly’s birthday. Happy birthday, Moll Ball! I hope you get that really big present today! (They’ve been house-hunting and today might be the day!)

Clearly we’ve been close for years and she’s always loved her big sister…

Happy Wine Wednesday! This week I’m going to tell you about the presents I gave Brandon for his birthday in April.

Wine tags from Amazon
Brandon and I are in two wine clubs (Davenport Cellars and Efeste) and have a tendency to collect wine faster than we can drink it. As a result, we have quite a few bottles “laying down” in our cellar. Unfortunately, our current set up doesn’t really allow for easy identification of bottles. Alas, present number one: wine tags! These were cheap and easy and I ordered 150 from Amazon.
In an effort to keep track of all of our bottles, to know which ones are ‘ready’ to drink and which bottles we need to replace, I also found present number two: our very own Personal Wine Curator! This thing is great. Here are the services they offer: Get drink dates, pair food and wine, track purchases, wine values and sales, print lists, tasting menus and reports, and interact with a worldwide community of fellow wine lovers. Because of Brandon’s school schedule, he has only had a chance to input about 15 bottles. So far, so good. He’s looking forward to inputting the rest of our bottles and exploring the system. It’s on his summer to-do list.
The third present was a find from the REWINED Designs shop on Etsy. Playing off of our last name, Szerwo (pronounced “Sir-vo”) I bought this customized aluminum sign that reads “Szerwo Szellars.”

Now that school is slowing down for the summer we’re going to really get into our new Szellar project. What about you? How do you organize your wine?
Happy Father’s Day to all those fathers out there! Have a great day and enjoy the sunny weather!

Me & my Dad
Me & my Grandpa

Me, my Dad and my sister (who is apparently double-fisting!)
This post has been a while in the making… After all, we did buy the barrels more than two years ago! This is a project that with a few tools and a few minutes, you should be able to do pretty easily too.
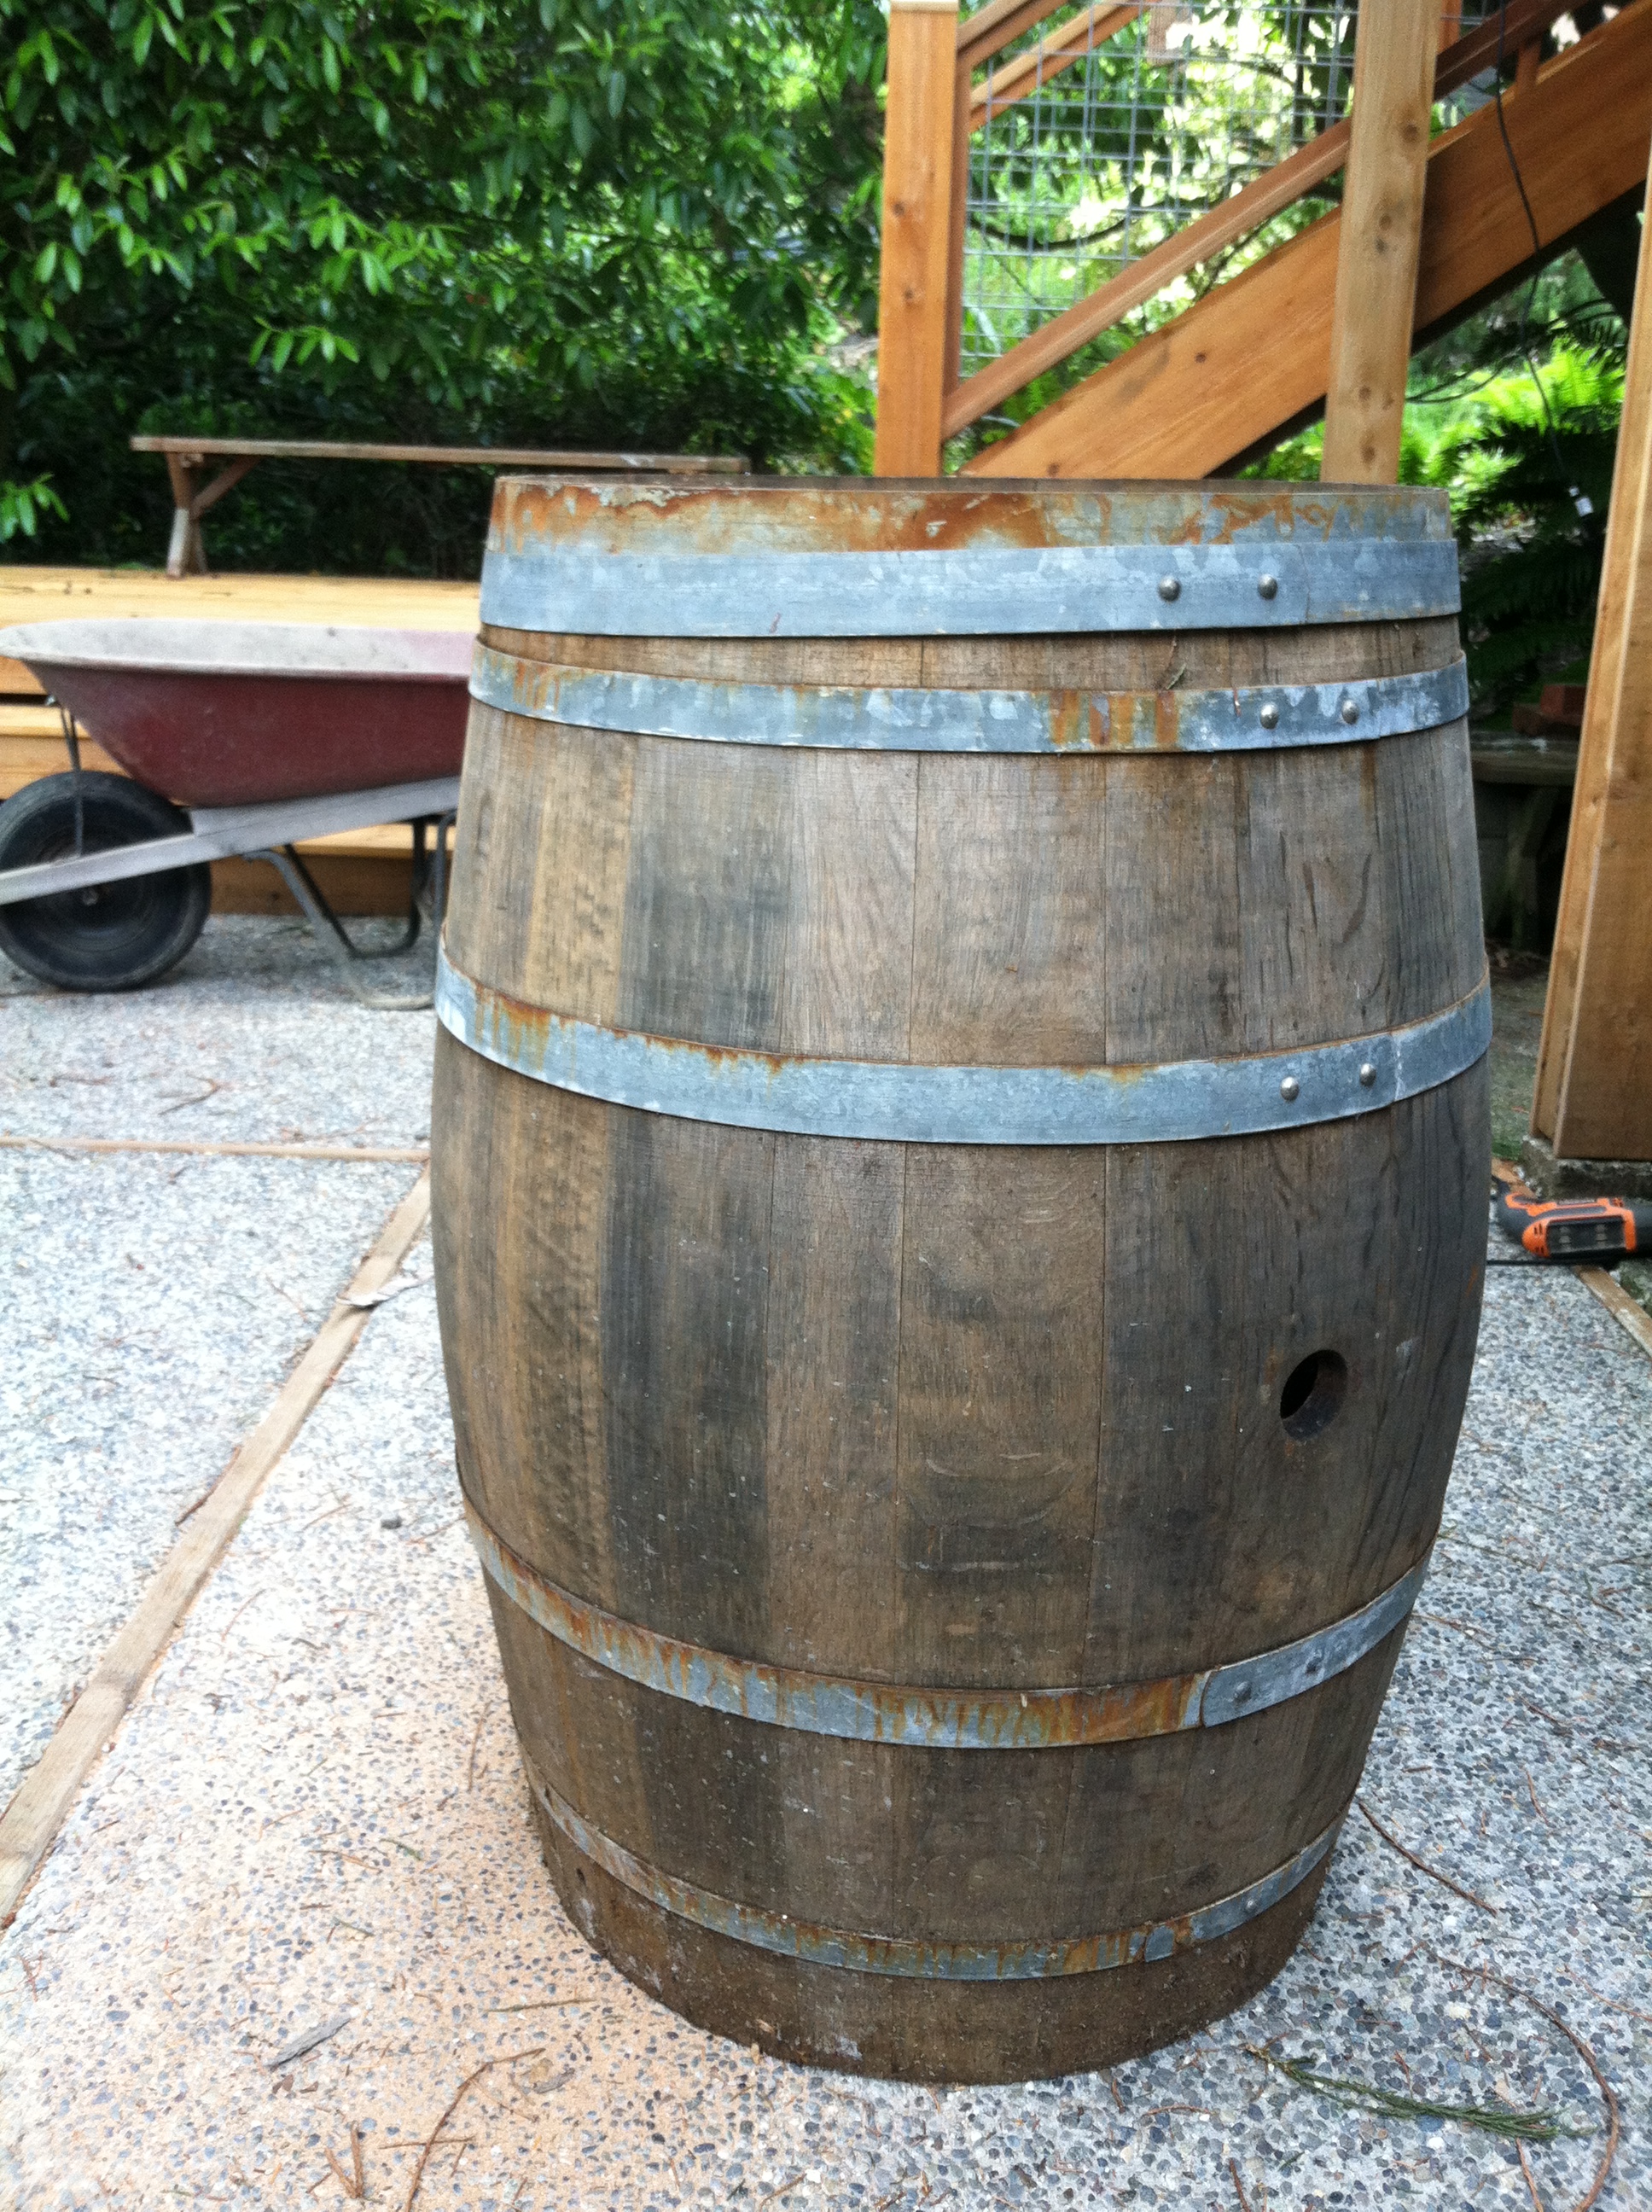
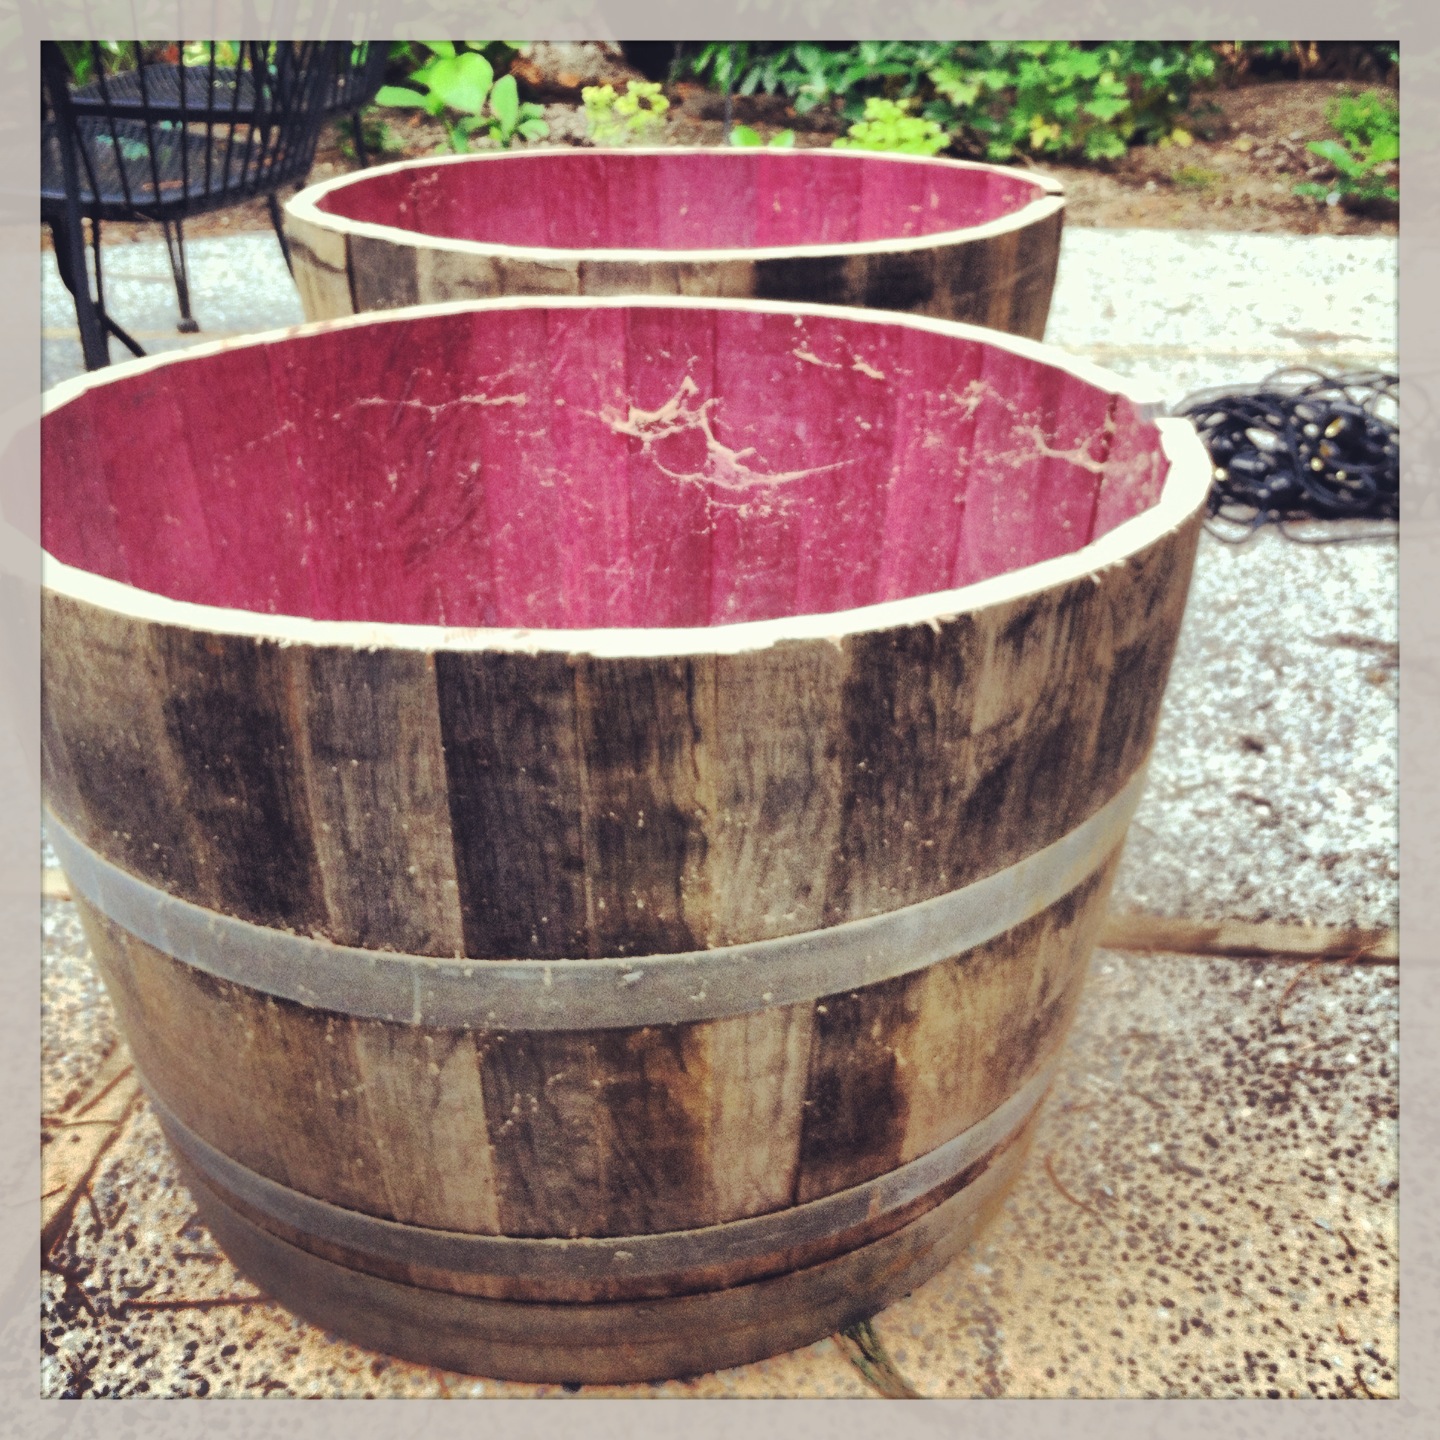
Wine barrel… Before
First, buy some wine barrels. We bought two many years ago from Efeste but you should be able to find some at your local winery. We paid $75 for two barrels and borrowed my parents’ Highlander to haul them back to Megan’s Island. What did we do next? We put on the patio and let them sit. For years. Next time I’ll take better care of them, so I have to spend less time cleaning them to get them spiffed up.
Next, decide what you want to do with them. I compile my ideas on my Pinterest page. For this particular project, I went with simple: cutting the barrels in half.
My Dad has all of the tools in the family (and the knowledge to go along with it) so we planned a wine barrel cutting date. He brought over his circular saw and he cut while Brandon and I rolled the barrel. We cut the first one straight across and I was so surprised to find a beautiful merlot color inside. (Duh. They’re WINE barrels.) Once I saw how cool and pretty they were inside, I decided to switch up the cut on the second barrel: oblong! (Ooooh! Ahhh!) My Dad was skeptical at first, but we tried it. And it worked SO WELL! I instantly fell in love with the oblong half barrels.
 Cutting the barrels was the easy part. Next came the cleaning. Oh, the cleaning. First, I sanded the edges. Brandon was the sanding expert but after busting through not one, two, three, four but FIVE sanding sheets (on four barrels, mind you), I’m now a whiz at removing and replacing the sanding sheets. (And then busting them again.)
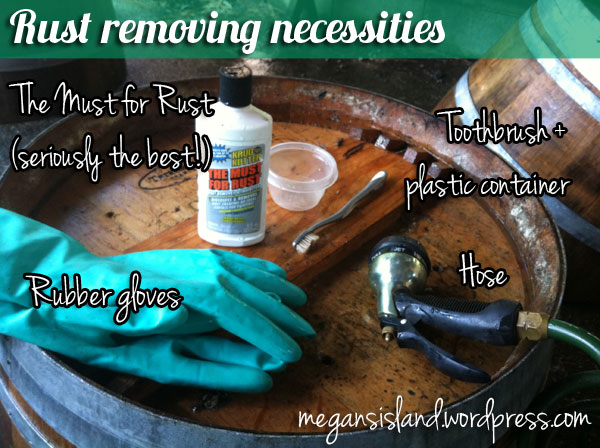
Once the edges were soft-ish and our cut marks were blended in, I started the process of making our aged barrels look brand new. First, I discovered “The Must For Rust,” a solution that truly is the must for rust. This stuff was AMAZING! So amazing, in fact, that I created my first video! Yay! (I’ll figure out how to post the video soon…stand by…)
The audio is a little rough, but basically I just show the camera that by applying the rust remover with a toothbrush and spraying it with water removed some pretty serious gross-ness. Here’s a before and after:

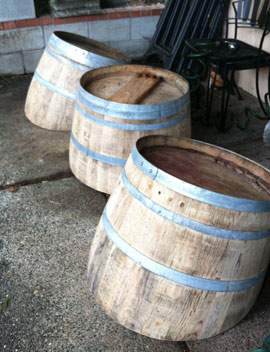
After the rust was removed, I got out the leftover 30-second outdoor cleaner from our deck-staining project. On went the gloves and I went to town on the barrels — the outside of the barrels only. The cleaner is essentially like bleach and really cleans whatever you’re cleaning. I had leftover cleaner, so I cleaned the random benches that came with our house. They’ve turned into a new project that I’ve started and am only half-way finished with. This is how the barrels looked after they were cleaned:
After letting the barrels dry overnight I woke up early to stain them. Unfortunately I discovered that I had unknowingly bought indoor stain. This wasn’t going to work for my planters, so it was off to Lowe’s I went. My impromptu Lowe’s trip was probably for the best, since I was able to pick out the perfect plants.
Back to staining. My staining technique worked surprisingly well, but I made an incredible mess. I’d recommend doing all of your staining work on a plastic drop cloth that you can throw away once you’re done. I didn’t do that and my next project will be trying to remove the brown stain from our concrete patio. I have some ideas. More on that in another blog post. So for the staining, I used a clean sponge and dipped it into the stain. I quickly discovered that gravity was my friend for this project and moved the barrels around with the drips. I also discovered that making a huge mess of the barrels (aka getting stain on the steel ring) and quickly wiping the stain off. It ended up being quite successful. I let the stain sit on the wooden parts of the barrel for just a few minutes and then wiped it off.
 This is what the barrels looks like half stained. I kind of like the two-tone look. Maybe for the next round of barrel planters that I make!
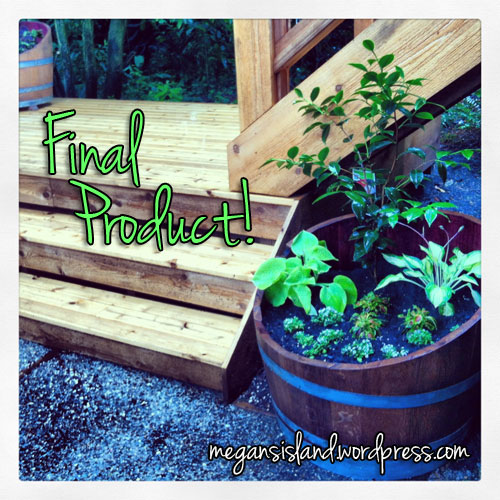
Once the barrels were stained, I used some spray paint lacquer inside to preserve the rich red color and planted them! I’m so, so, so excited with how they turned out. What do you think? Have I inspired you to do something fun with a wine barrel? We have many more ideas, so check back for more fun projects!
One word of warning: After spending a full weekend with the opened wine barrels turned me off a bit from wine. It seemed like stale red wine was the only thing I could smell for awhile! Don’t worry, the deterrence only lasted that weekend. I’m enjoying a Malbec as I type!
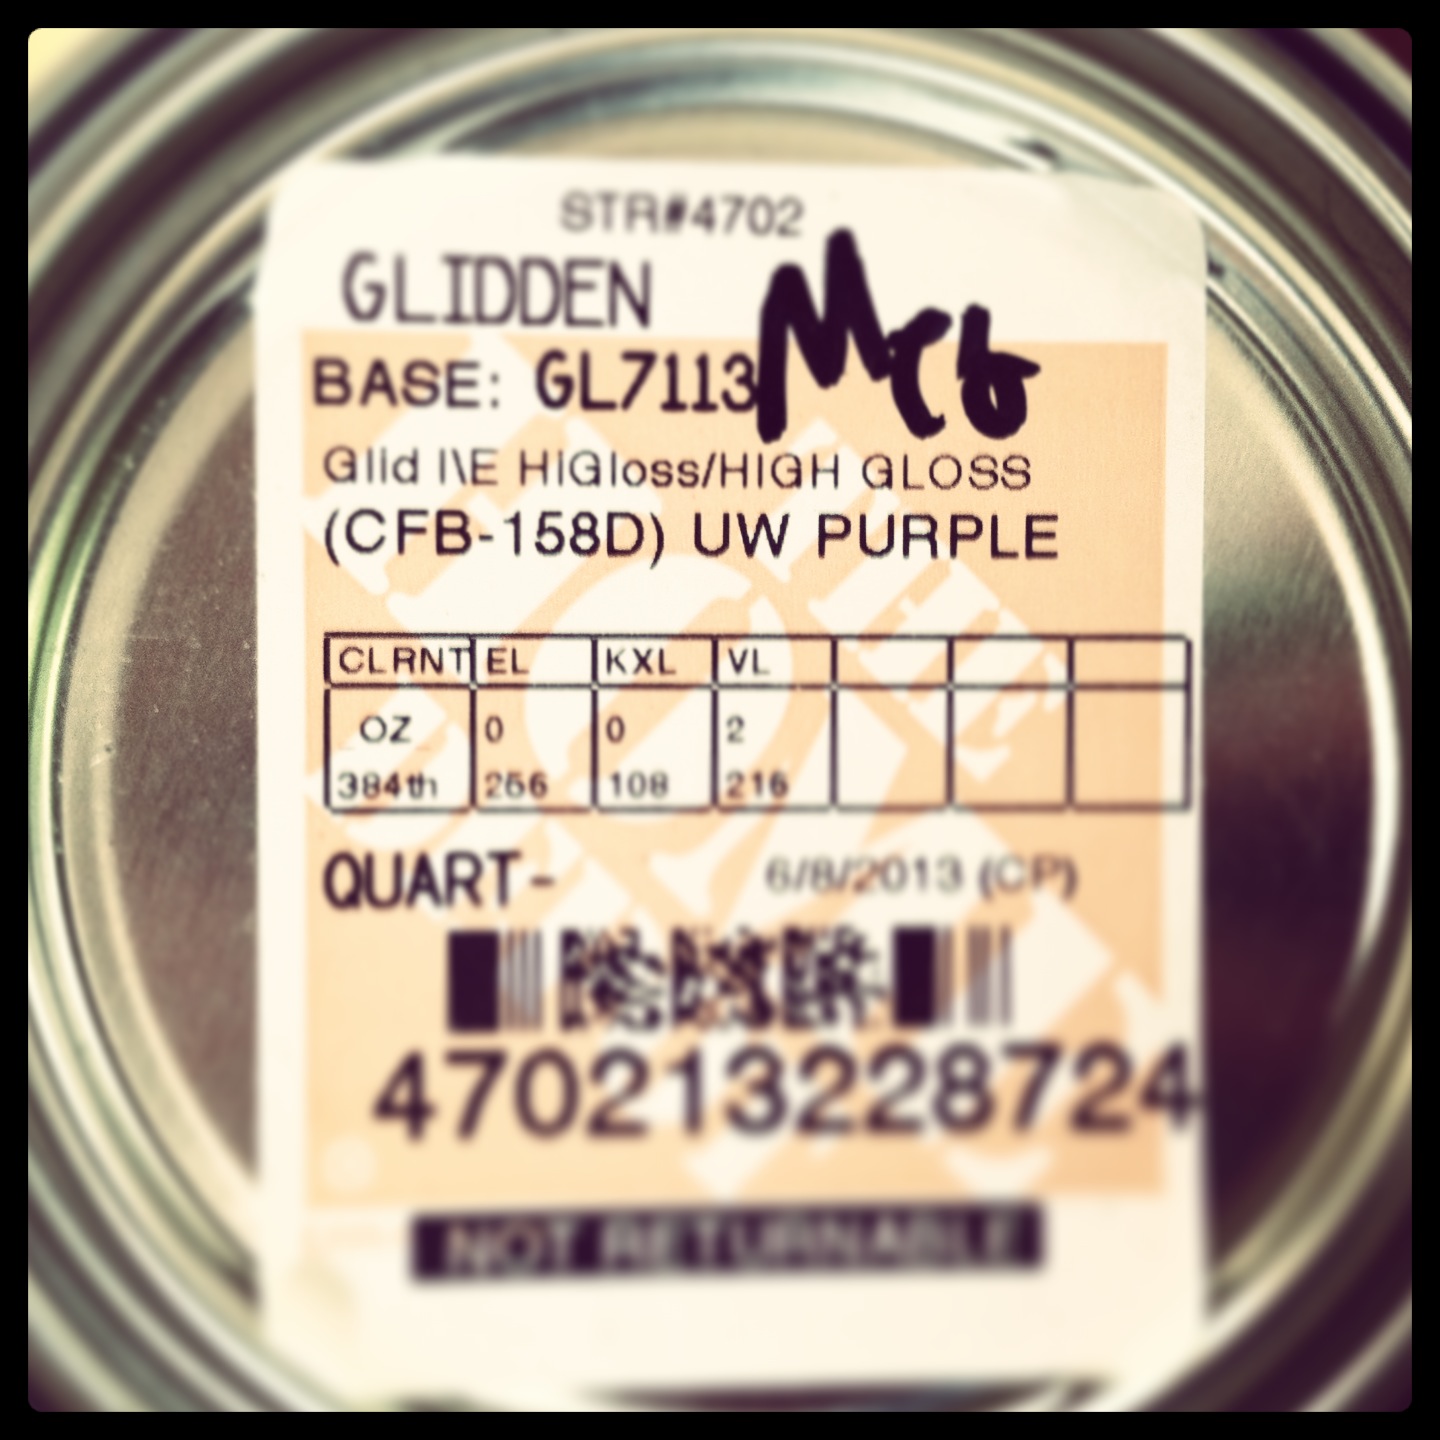
“UW Purple” !!!
Man… what a weekend! Brandon has been immersed in his studies — finals are next week — so I had the weekend more-or-less to myself and a long to-do list of house projects.
Brandon and I are both University of Washington alums and there is Husky paraphernalia all over our house. I decided to take it a step further and did two UW-related projects this weekend.
The first, Husky “W” benches! These classic, boring benches came with my house and have been un-cared for more than five years. They’re still a work in progress, but this weekend I designed, primed, painted and lacquered the tops of the two benches. I’ll let them dry through tomorrow and then turn them over and paint the underside and legs “UW Purple.” (It’s an actual color! Thank you, Home Depot!)
Here is the work in progress… I’ll post more photos and a step-by-step tutorial when the project is finished.
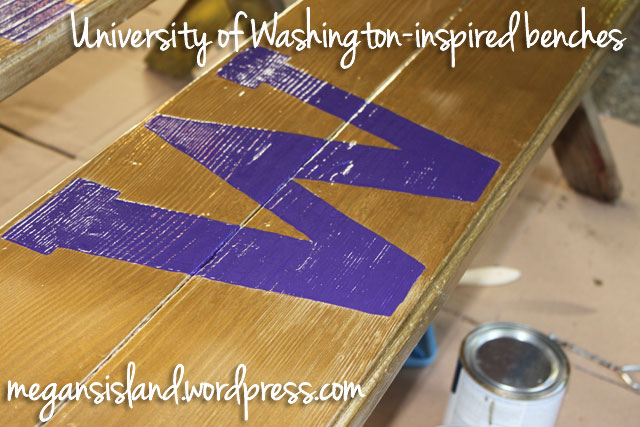
UW-inspired benches
While I was at Home Depot picking up “UW Purple” and other various paint colors, I also picked up two tiki torches for the backyard. (More on that on Friday for my “Gone Pinning” post on mosquitoes!) I’ve had two French florist buckets (of sorts) from IKEA that would make the perfect base for the torches for years. These buckets needed some TLC, so this morning, they got it!
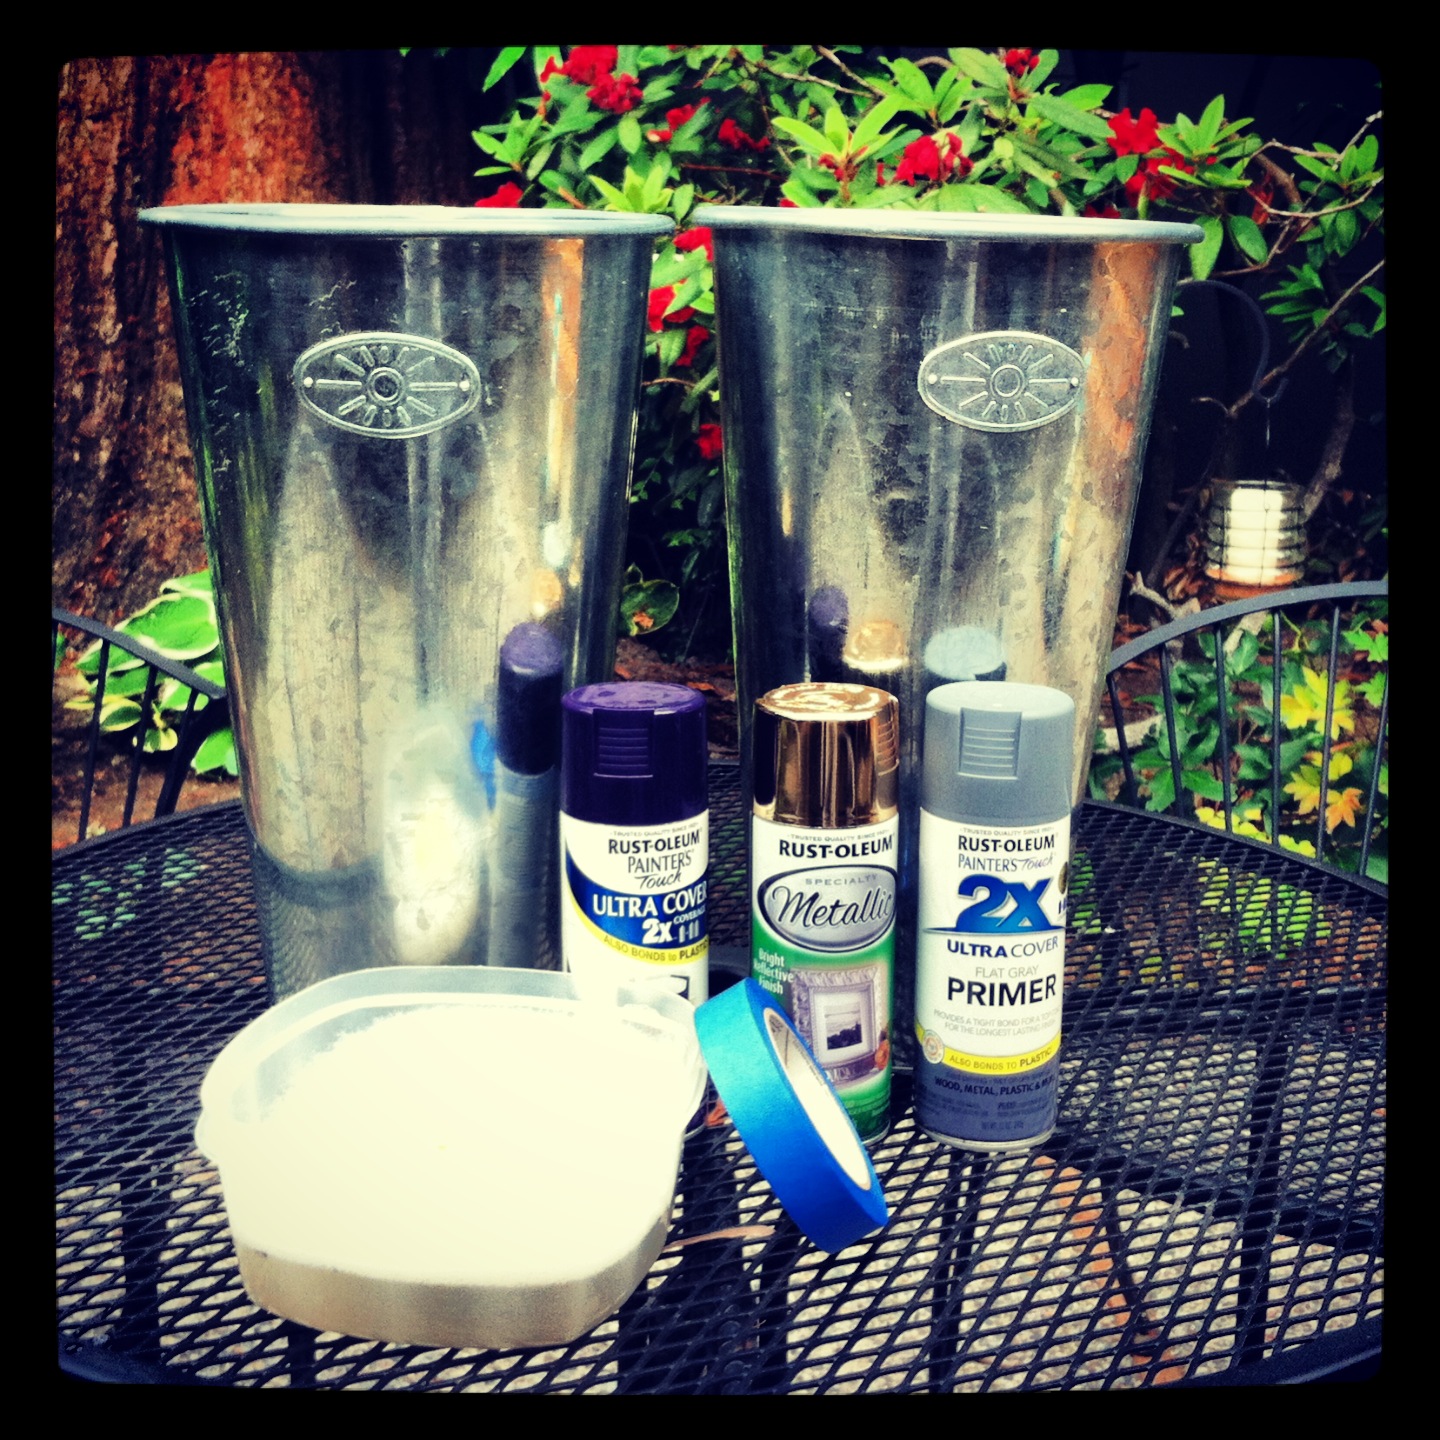
UW Husky-inspired tiki torch buckets
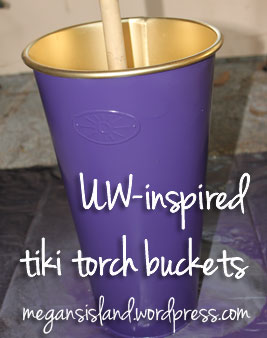
Tiki torch buckets!
I had all of the tools I needed to make this project a success: soapy water and a sponge, blue painters tape and various spray paints (primer, gold and purple). First, I cleaned the buckets. They had a lot of concrete residue from our patio project, but it came off surprisingly easily. After the buckets dried, I primed them, taped the lip and painted the base purple. After that dried, I re-taped and painted the lip and inside GOLD. I love my gold spray paint!
I filled the buckets with some cheap rocks/sand that I found at Home Depot, added the torches and voila! We’re ready for mosquito-free outdoor dining!
Oh, and I went a bit overboard and also painted the rocks inside gold. GO DAWGS!!
Gold spray paint = my favorite

Pinterest-ing (pinning) is one of my favorite past times. Pinterest can be a hobby, right?
So… I’m starting a new weekly feature: Gone Pinning. It will be your weekly glimpse into what I’m looking at, projects I’m envisioning and new recipes that I’m thinking of trying out.
You can wait for Gone Pinning at the end of each week or you can see my pins in real-time on Pinterest, here.
Have a great weekend!
I’ve been working on a very long post about our latest wine barrel planter project, but it’s not quite ready for prime time yet, so you get a fun new recipe instead…
Brandon and I first tried this appetizer at a wine release party at Nota Bene Cellars last summer so after a few test runs, we found this recipe from What’s Cooking America. With a few tweaks, we made it our own and it turned out great!
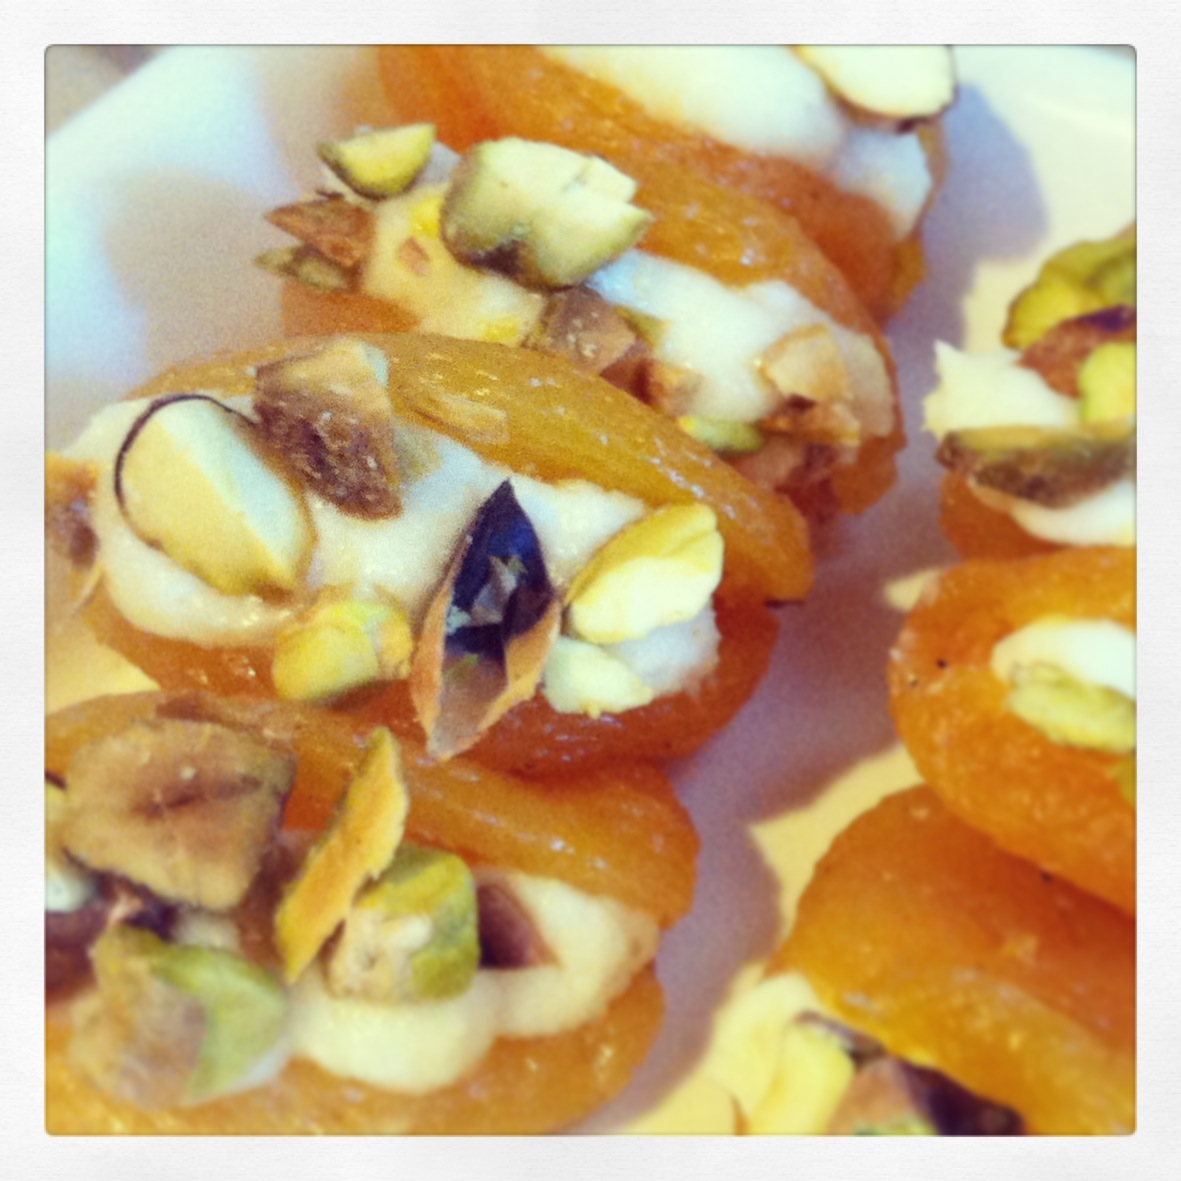
Presenting: Honey mascarpone filled apricots with pistachios
 Ingredients:
The nice thing about this recipe is that its pretty easy and quick and all of the ingredients can be found at Trader Joe’s. First, the bring water and sugar to a boil in a medium saucepan. Reduce heat to low, add the crushed cardamom seeds and lemon juice. Add the apricots and let them simmer for approximately 15 minutes or until they puff up. Remove pan from heat. Let the apricots cool. Once they’re cooled, open up the apricots a little more, but not too much, since you want it to be a pocket of sorts.
This is where I deviated from the original recipe a bit. We did a few sample runs of this recipe and it wasn’t quite sweet enough. Apparently Brandon’s sweet tooth has rubbed off on me! To sweeten up the recipe I added some honey to the mascarpone and mixed them up (by hand) real good. I then put the mixture in a ziploc sandwich bag and snipped off the corner of the bag – creating my very own piping bag! This made getting the mascarpone in the apricots very easy. Add a drizzle of crush pistachios and voila! Serve and enjoy! We enjoyed ours with the 2011 Efeste Sauvage Sauvignon Blanc and some boursin, crackers and cured meats. A delicious combination.
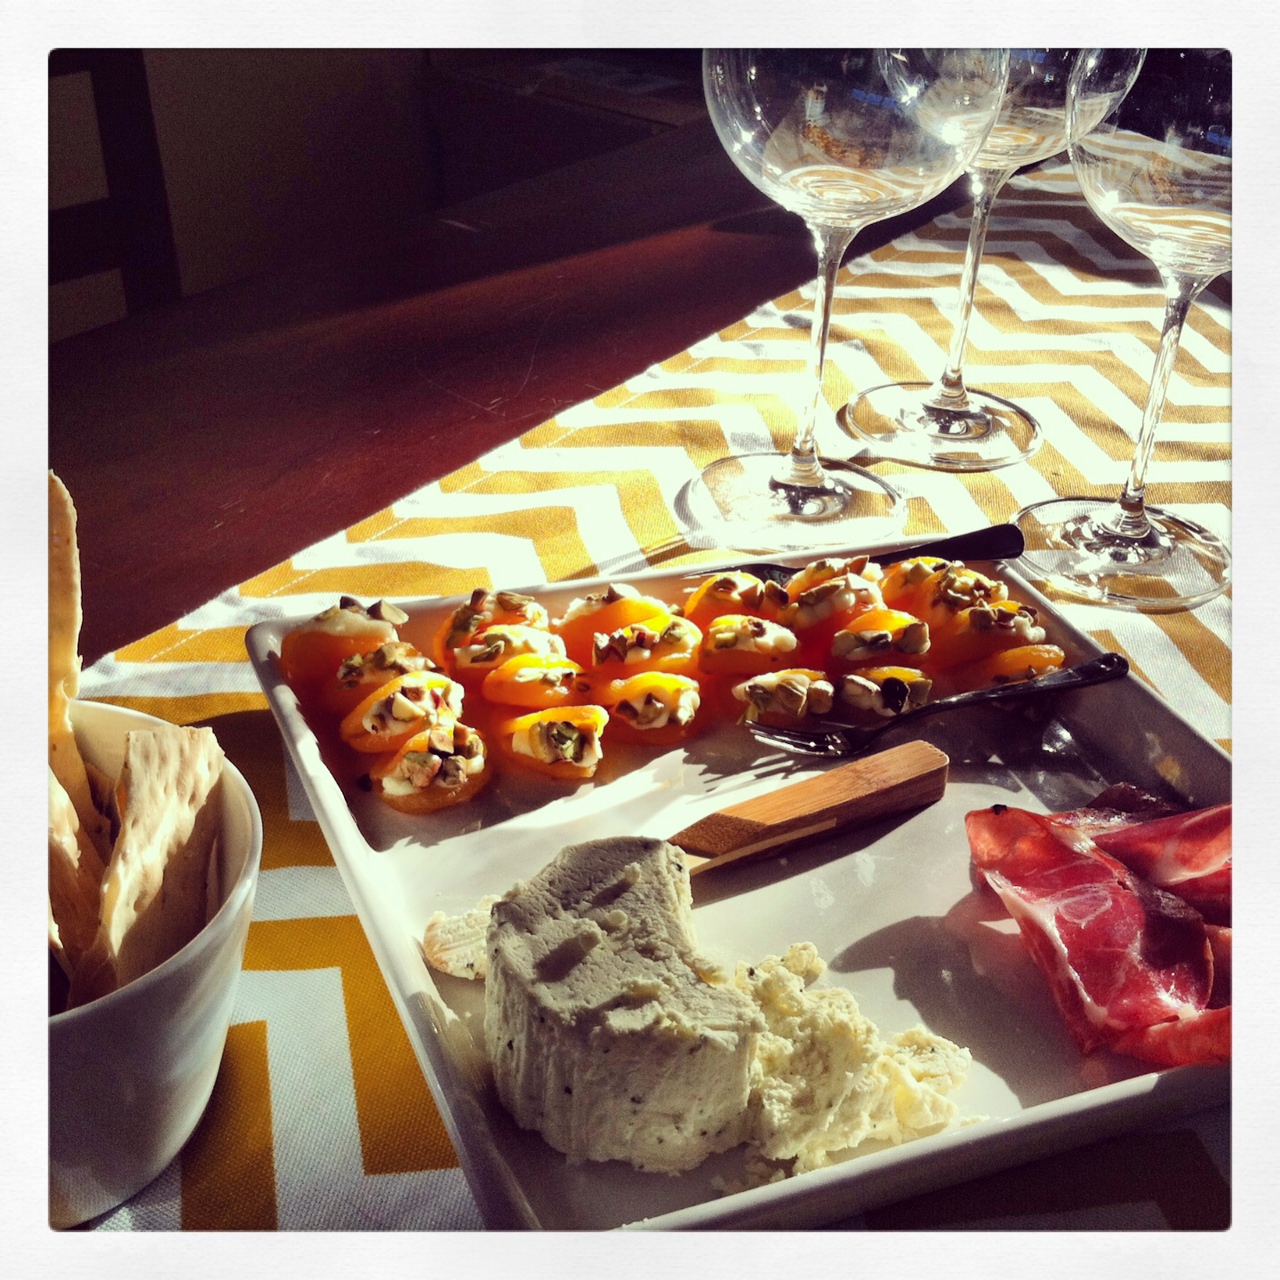
How were they? Really good. We’ll definitely make these again soon. Next time I may drizzle them with a balsamic reduction. Have a great {Wine Wednesday} and tell me what deliciousness you’re pairing with your glass of wine today!
A Race to Visit all 423 Units of the NPS
Healthy Lifestyles | Removing Toxic Chemicals
Buffalo Streets
My journey in surrogacy and motherhood
A Snugbottom Family Publication
The Art in Party Planning
“Where would we be without salt?” - James Beard
visionary author
Food Photography & Recipes
HANDMADE GIFTS
the whirlwind of life with a touch of lovely
a little bit of our everydays
Chronicling a delusional gardening experience.
