Golden pine cone basket

Brandon and I took advantage of a recent storm and did some foraging around the neighborhood. We found a fallen maple trunk that we grabbed for our future pizza oven or fire pit use.

Foraging for firewood

We also found these huge pine cones from a neighbor’s tree. I had scoped them out as I was driving home from the store, so we brought a bag to pick up the good ones.

Foraged pine cones | Megan's Island Blog

After letting them dry out for a bit — and un-critter themselves — I set up my spray painting station on the patio and got my most favorite metallic gold spray paint from Rust-oleum. I can’t get enough of this stuff.

Spray painting | Megan's Island Blog

After spraying on the first coat, I posted this photo to Instagram and Pinterest and it’s brought me more traffic than anything else I’ve ever posted. Ever. And not just American traffic. I’ve had blog viewers from Bulgaria, Australia, Finland, Ireland and the UK, among many others. Thank you, Pinterest!

I used a fun basket that I had purchased from the Goodwill ($1.99) and spray painted it a deep red, Rust-oleum Regal Red, to be specific. It took a few coats and turned out really great. Perfect for the gilded pine cones.

I sprayed the pine cones a few more times and placed them in the new red basket. I think it turned out pretty well. What do you think?

Golden pine cone basket | Megan's Island Blog

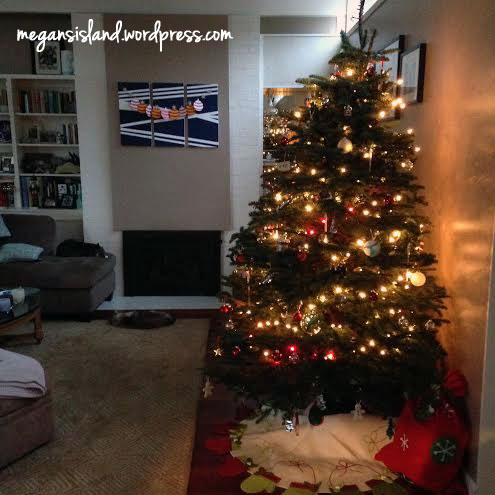
And a shot of our cozy living room, decked out for the holidays.

Cozy holiday living room | Megan's Island Blog

Christmas garlands

One of my favorite holiday traditions is speed tree shopping at Home Depot or Lowe’s. (Or Costco once.) Over the weekend we made the trek to Issaquah (about 10 minutes away), went out for a romantic lunch and spent 3.5 seconds picking out our seven foot tall Noble Fir Christmas tree at Lowe’s.  It’s a real beauty.

Tree

Once we got the tree home, it was time to bust out the five boxes of Christmas decor from the garage. A few hours later, the tree was trimmed and the halls were decked.

Here are some inexpensive DIY Christmas garland ideas. I’ve been scouring Pinterest for additional DIY decoration ideas and I’ll post those this Friday for my “Gone Pinning” feature.

Ornament candle holders | Megan's Island BlogI stopped by IKEA on Black Friday, after I was done with my morning shopping, (Why? Because I’m a crazy person, apparently), and found their holiday goodies.

Much to my delight, I discovered that they had these festive holiday Snofint glasses on special, for $0.49 each. No sense not having a full half set, so I bought six. Of course Brandon was pleased. (One of his least favorite impulse buys of mine is frivolous glassware.)

After I washed the glasses, I added some decorative sand and a candle and voila! quick, easy and festive. I’ve got four on the dining room table and the other two are adding some holiday cheer in the bathrooms.

I also found these amazing Snofint coasters, that come in packs of 10 and cost $0.99. They were such a deal that I bought four packages.

Here are the coasters:

Snofint coaster IKEAWith a large needle and some white embroidery floss, I set about making my garlands. Here they are. What do you think? I love them and am looking forward to putting them up, year after year.

Christmas coaster garland | Megan's Island Blog

Christmas coaster garland #2 | Megan's Island Blog

I also made this garland last weekend with some felt balls. It’s another one of my favorites.

Felt Ball Garland | Megan's Island Blog

The house is shaping up quite nicely! Have you put your decorations up yet?

Christmas

{Gone Pinning} Gluten-free Thanksgiving… with all the fixins’

GonePinning

I kid. I like feasts full of gluten but I also like gluten-free feasts!

I kid. I like feasts full of gluten but I also like gluten-free feasts!

I’m coming more around to the idea that Thanksgiving is almost here — in less than a fortnight (thank you, Heather), nonetheless.

As I mentioned last week, Brandon and I won’t do much cooking for the holiday, so this post is really targeted at my parents (thank you for reading) who will hopefully be considering some of these ideas for our holiday feast. This post is also for a dear friend of mine who is throwing her first gluten-free Thanksgiving (hi, Megan!), so hopefully this provides inspiration for her too. (Man, that’s a lot of pressure on this post!)

So, here we go. First things first: gluten-free appetizers:

A cute, holiday-inspired veggie display

A cute, holiday-inspired veggie display

Bacon-wrapped dates? Yes please.

Bacon-wrapped dates? Yes please.

Sweet potato crostini

Sweet potato crostini

And some ideas for gluten-free side dishes:

Lemony Brussels sprouts

Lemony Brussels sprouts

Wild rice and mushroom stuffing

Wild rice and mushroom stuffing

Honey-roasted butternut squash

Honey-roasted butternut squash

Spuds!

Spuds!

I’m going to assume that you gluten-free’ers have the main dish covered. Mom & Dad: I hope it’s turkey!

Which leaves us with some gluten free desserts!

Gluten-free pie crusts

Gluten-free pie crusts

Pumpkin-ginger cupcakes

Pumpkin-ginger cupcakes

Gluten-free fig frangipane tart

Gluten-free fig frangipane tart

If you do use any of these recipes or re-pin these, I’d love to hear about it in the comments below! And if you’d like to see all of my Thanksgiving pins, visit my board. Please note: not all pins on my Thanksgiving board are gluten free.

Happy menu planning and have a great rest of the weekend!

Happy Election Day!

2013 I voted OSOSIt’s the first Tuesday following the first Monday in November, which means its a very special day: Election Day.

I’m a bit of an elections nut (I worked as a spokeswoman for the Elections Department for many years) so I love Election Day and I love educating voters on the process. Now, it’s your turn. In Washington, we don’t have polling places. Instead, we vote entirely by mail. We received our ballots three weeks ago and after reading all of the mailers, the voter pamphlets and the endorsements, we voted.

If you haven’t voted yet, make sure you return your ballot TODAY! Ballots need to be dropped off in a ballot drop box by 8 p.m. You can also return your ballot via the USPS, and it must be postmarked with today’s date.

Save a stamp! Fill out your ballot and drop it in one of these!

Save a stamp! Fill out your ballot and drop it in one of these!

For all you King County voters, here are some useful links for you:

Here I was this morning sign waving for a candidate that I’m endorsing for Mercer Island City Council. Go Rich! This was my first time working on the campaign side of things and I really enjoyed it! What do you think of our “Waving Rich” cutout? They’ve been all over Megan’s Island!

Mercer Island voters: Vote for Rich! http://voteforrich.org/

Mercer Island voters: Vote for Rich! http://voteforrich.org/

Halloween dinner

2013-10-31-Halloween1

We celebrated Halloween a bit early this year, so I could share this delicious post with you in honor of “the big day.”

This recipe doesn’t have a spooky name (although I’m open to suggestions!) but it looks pretty eerie.

Spooky Halloween Pasta | Megan's Island Blog

We love making pasta from scratch and used our favorite pasta recipe with a packet of squid ink that we purchased from Big John’s PFI awhile back, two packets for $2.50. There was a 2011 date on the package and Brandon was able to read (in Spanish) that the ink was good for four years beyond that date. So, we tried it.

Spooky Halloween Pasta with squid ink | Megan's Island Blog

We mixed the ink into the eggs and then mixed that in with the flour and salt. Then we mixed and mixed and mixed with the Kitchen Aid. We didn’t get the look we were hoping for (solid black) and instead ended up with a speckled/cookies ‘n cream coloring. Don’t get me wrong, it looked plenty spooky.

Spooky handmade Halloween squid ink pasta | Megan's Island Blog

Being the students that we are, we wanted to know what we did wrong, so we did some Google-ing  to find some answers. It turns out that we were totally on the right track, but we skimped on the ink. Most of the recipes we found used at least three tablespoons of ink. We used the equivalent of 1/2 teaspoon.

While we [Brandon] were making the pasta, we [Me] made the sauce. It’s my favorite spaghetti sauce, which is totally easy. Here it is, in a nutshell: one onion, chopped, sauteed with one package of Italian sausage flavored ground turkey, one tablespoon of minced garlic, a few sliced mushrooms, two cans of diced tomatoes with their juice, some balsamic vinegar and dried herbs. Voila! Delicious sauce.

Don’t worry. We also had my favorite kale salad and the Ghost Pines wine I mentioned in yesterday’s post. Combined? Everything was amazing. Happy Halloween to us! And to you, of course.

{Wine Wednesday} Cheers to Halloween!

WineWednesday

How will you toast Halloween? As you know, I’ve been scouring the internet for all-things Halloween. And in today’s post, some great (and surprisingly simple) adult beverage options to celebrate Halloween tomorrow.

Check out these recipes, head to the liquor or grocery store and enjoy!

First, the Brain Hemorrhage shooter from the Coyote Thistle blog. This looks so gross, but also looks so easy to make– and I love any and everything with peach schnapps.

Coyote Thistle Brain Hemorrhage shooter

Make one for yourself:

  • 1 oz Peach Schnapps
  • 1 teaspoon Bailey’s Irish Cream
  • 2 drops Grenadine

In a shot glass, pour in the Peach Schnapps. Slowly add the Irish Cream followed by the grenadine.

Next, we’ve got the Vampire Raspberry Bite from Alexandra Hedin, one of my favorite lifestyle and entertaining experts in Seattle.

2013-10-30 Vamp bites

Make one for yourself: 

  • 1 tablespoon corn syrup
  • 1/2 teaspoon grenadine
  • 2 oz Absolut Raspberri
  • 4 oz Talking Rain raspberry-flavored sparkling water

Mix the corn syrup and grenadine in a shallow bowl, one that is as wide as the rim of your glass. Turn the glass upside down and cover the rim with the “blood.” Add the vodka and the sparkling water for a “berry” refreshing and slightly scary Halloween cocktail. (Also? I’m planning on making these for our True Blood premiere party next June!)

And in true Megan’s Island and Wine Wednesday fashion, here is a third option, one that we’ll for sure be indulging in: a red blend from Ghost Pines.

About the wine from the Ghost Pines website:

Our Ghost Pines 2011 Red Blend showcases the complexity and balance that the right combination of the right grapes can achieve. The Bordeaux varieties of Cabernet Sauvignon, Merlot, Cabernet Franc and Petit Verdot in this blend act as the stoic Dr. Jekyll, while the Petite Sirah, Zinfandel and Sangiovese are a classic Hyde: assertive, aggressive and maybe even a little disturbed. Aromas of blueberry and blackberry pie are framed nicely by salted caramel, spice and truffle notes. Rich and full-bodied, this blend offers chewy tannins and a long, luscious finish.

Ghost Pines Red Blend 2011

Spooky. [Spoiler alert: we enjoyed this wine last night and it was quite good. It was incredibly dark and full-bodied. I’d recommend it!]

Cheers and HAPPY HALLOWEEN!! What will you be drinking tonight/tomorrow to celebrate?

Great Plastic Pumpkin Hack of 2013

You know IKEA hacks, right? They typically involve taking a generic, common product and customizing it. I took my own advice and did a last minute, DIY “hack” over the weekend, but not with a table or dresser from IKEA. Instead, I hacked one of those cheap orange pumpkin candy holders from Target.

My pumpkin hack was quick and dirty and I learned quite a bit as I went. I took my pumpkin straight from the store to my spray-painting station– a cardboard box on the back patio. Why was this wrong? I didn’t prep the pumpkin properly, so the paint didn’t really stick and there were a few places where the paint actually peeled straight off. I should have either wiped the surface off with rubbing alcohol or sprayed a coat of primer on, or both. Alas, hindsight is 20-20. And the pumpkin will be just fine for this year. Maybe I’ll hack it again next year, doing something completely different!

Once the pumpkin was painted with a few light coats of Rustoleum’s metallic black spray paint, I took a gold paint pen and filled in the “carved” portions of the pumpkin: the eyes, nose and mouth. While I was spraying the pumpkin, I used my metallic gold spray paint and sprayed “stretchy spiders” (that’s what Target calls them…) Once those were dry, I used hot glue to adhere them to the pumpkin. Another lesson here: it only partially worked: two spiders stayed adhered, two didn’t. I’ll be applying super glue to the difficult ones shortly. Hopefully they will cooperate.

Finally, I snipped off the boring black plastic handle and replaced it with a sheer gold ribbon that I found in the basement. I had just the right amount, which means that it really was meant to be.

So, what do you think of the Great Plastic Pumpkin Hack of 2013?

Plastic pumpkin hack | Megan's Island

Finished product!

Plastic pumpkin hack side view | Megan's Island

Oooh! Scary! Gold spiders in search of treats!

Of course you want to know what’s inside, right? We’ve got: Junior Mints, Whoppers, Snickers, Reese’s Pieces, Reese’s Peanut Butter Cups, Hersey’s milk chocolate and cookies ‘n cream bars, and Twix bars. All of our favorite things! Thankfully Megan’s Island sees very few trick-or-treaters, so most of that deliciousness will be kept for us.

Plastic pumpkin hack CANDY | Megan's Island

Nom. Nom. Nom. Think we’ll be able to save some candy for Thursday? Me neither.

Total cost for the great pumpkin hack?

  • Plastic pumpkin: $1 (Target)
  • Plastic spiders (4-pack): $1 (Target)
  • Spray paint of your choice: ~$4/can (I always use Rustoleum)
  • Paint pen: Varying costs, depending on what you get
  • 12″ of Ribbon
  • Hot glue (and then crazy glue)

Total for me: $2 and ~ 10 minutes of hands-on time.

{Gone pinning} Last-minute Halloween decor

GonePinning

So…did you realize that Halloween is in six days? Six days! If you’ve been as busy as I have, it’s possible that October zoomed right by and this weekend is your last chance to dress up your house for the holiday. Without further ado, here are some of the best last-minute, low-energy, no-creativity-needed DIY decorations ideas for Halloween. Check out all of my Halloween inspirations over on Pinterest.

Here, I’ll even give you the link to a JoAnn’s crafts coupon. Now there is no excuse not to celebrate:

Some red paint and a new shower curtain and bath mat make for a very Halloween bathroom.

Some red paint and a new shower curtain and bath mat make for a very Halloween bathroom.

Broom? Check. Three witch hats? Check. Some string to hang them from? DONE! Perfect for the entryway or a Halloween photo booth

Broom? Check. Three witch hats? Check. Some string to hang them from? DONE! Perfect for the entryway or a Halloween photo booth

Classy, easy-to-make "wicked" candles.

Classy, easy-to-make “wicked” candles.

Possibly the cheapest napkin holders ever... Eight vampire teeth for $1 at Target

Possibly the cheapest napkin holders ever… Eight vampire teeth for $1 at Target

Wreath + hot glue + snakes + spray paint = Perfect, scary wreath

Wreath + hot glue + snakes + spray paint = Perfect, scary wreath

Cheesecloth + styrofoam heads + fabric stiffener. I bought the supplies for this project years ago. Maybe this year I'll actually make them!

Cheesecloth + styrofoam heads + fabric stiffener. I bought the supplies for this project years ago. Maybe this year I’ll actually make them!

More cheesecloth and fabric stiffener. He's just so cute mummified! (And then maybe sprayed with glow-in-the-dark paint!?)

More cheesecloth and fabric stiffener. He’s just so cute mummified! (And then maybe sprayed with glow-in-the-dark paint!?)